
Mig welding is one of the most popular methods for joining metal. It’s fast, efficient, and easy to learn. But even experienced welders can make mistakes that lead to weak joints, ugly welds, or wasted materials. Many beginners struggle with MIG welding because they miss small details that matter.
If you want strong, clean welds, it’s important to know the most common mistakes—and how to avoid them.
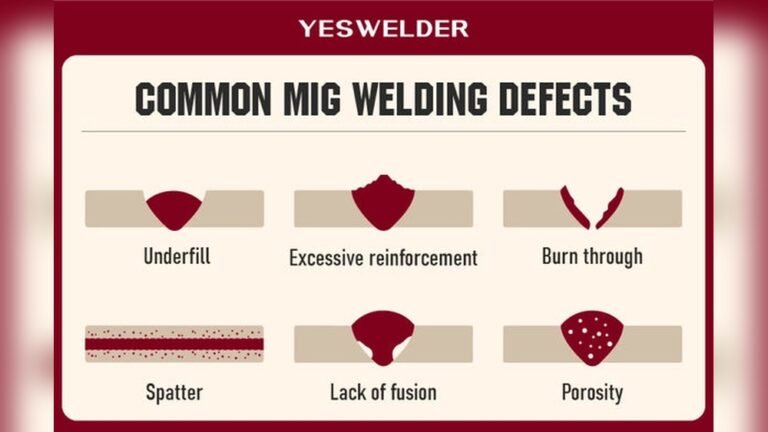
Common Mig Welding Mistakes
Many welding problems come from basic errors. Here are some of the most frequent mistakes:
1. Incorrect Wire Feed Speed
Setting the wire feed too fast causes splatter and uneven welds. Too slow, and the arc becomes unstable. Most welders should start with the manufacturer’s recommended setting for their wire and metal thickness. Small adjustments make a big difference.
2. Wrong Voltage Setting
Too much voltage burns through thin metal. Too little voltage leads to poor penetration and weak welds. Always check your machine’s chart or manual. For example, welding 1/8-inch steel often needs around 18–20 volts.
3. Bad Shielding Gas Flow
Shielding gas protects the weld from contamination. If the flow is too low, air will mix with the weld and cause porosity. Too high, and turbulence pulls in air. Most welders use 20–25 cubic feet per hour (CFH) for mild steel.
4. Poor Gun Angle
The angle of the welding gun affects bead shape and penetration. Beginners often hold the gun too steep or too flat. The best angle is usually 10–15 degrees from vertical, pointing toward the direction of travel.
5. Improper Travel Speed
Moving the gun too fast creates thin, weak welds. Too slow, and the weld piles up, wasting wire. Watch the puddle as you weld—a good speed keeps the puddle smooth and consistent.
6. Dirty Base Metal
Paint, rust, oil, or dirt on metal will ruin a weld. Always clean the surface with a wire brush or grinder before welding. This prevents contamination and improves strength.
7. Wrong Wire Type
Using the wrong wire for your material causes weak joints. For example, ER70S-6 is best for mild steel, but stainless steel needs a special wire. Always match wire to metal.
8. Ignoring Machine Maintenance
Clogged liners, worn tips, or loose connections create arc problems. Regularly check and clean your equipment. Replace parts when needed.
Mig Welding Error Comparison
Let’s look at how different mistakes affect weld quality:
| Error Type | Common Result | Fix |
|---|---|---|
| Wire feed too fast | Splatter, uneven bead | Lower feed speed |
| Low shielding gas | Porosity, weak weld | Increase gas flow |
| Dirty metal | Contamination, poor adhesion | Clean base metal |
| Wrong wire type | Cracking, weak joints | Use correct wire |

Credit: www.youtube.com
How To Avoid Mig Welding Mistakes
You can reduce problems and get better results by following these steps:
- Read your machine manual: It has recommended settings for wire size, voltage, and gas flow.
- Clean your metal: Remove all dirt, rust, and paint before welding.
- Check your gun angle and speed: Practice holding the gun at the right angle and moving at a steady pace.
- Maintain your equipment: Replace worn tips and liners regularly.
- Choose the right wire and gas: Match them to your base metal.
Many beginners ignore these steps. But even small changes can make your welds stronger and cleaner.
Data: Mig Welding Settings For Common Metals
Here’s a quick comparison for typical steel thicknesses:
| Metal Thickness | Wire Size | Voltage Range | Wire Feed (in/min) | Gas Flow (CFH) |
|---|---|---|---|---|
| 1/16″ | 0.023″ | 15–17 | 150–250 | 20–25 |
| 1/8″ | 0.030″ | 18–20 | 250–350 | 20–25 |
| 1/4″ | 0.035″ | 22–24 | 350–500 | 25–30 |
These numbers are a starting point—always adjust for your specific machine and project.
Non-obvious Insights
Many beginners miss two key ideas:
- Ambient conditions matter: Wind or drafts can blow away shielding gas, causing porosity even if your settings are correct. Try to weld indoors or use wind screens.
- Weld bead appearance tells a story: A flat, shiny bead usually means good penetration and settings. Dull or cracked beads signal problems. Watch your bead closely.
Real-life Example
A hobbyist welding a car frame with the wrong wire (using mild steel wire for stainless parts) found cracks after just one month. Switching to stainless wire and adjusting voltage fixed the problem. Mistakes like this can cost time and money.

Credit: yeswelder.com
Tips For Better Mig Welding
- Start with scrap metal: Practice settings before working on your project.
- Use short bursts: For thin metal, weld in short sections to prevent warping.
- Keep spare tips and liners: Replace them at the first sign of trouble.
- Watch your weld puddle: Adjust speed and angle to keep it smooth.
Mig Welding Mistake Severity
Here’s how serious some mistakes can be:
| Mistake | Impact | Difficulty to Fix |
|---|---|---|
| Dirty metal | Weak weld, failure | Easy (clean and re-weld) |
| Wrong wire | Cracks, corrosion | Moderate (replace wire, re-weld) |
| Poor gun angle | Ugly bead, poor penetration | Easy (practice technique) |
| Low gas flow | Porosity, weak joint | Easy (adjust flow) |

Credit: www.youtube.com
Frequently Asked Questions
Why Does My Mig Weld Look Rough And Uneven?
A rough weld often means wire feed speed or voltage is set incorrectly. Check your settings and practice moving the gun smoothly.
What Causes Porosity In Mig Welds?
Porosity is caused by contaminated shielding gas or dirty metal. Make sure your gas flow is steady and the base metal is clean.
Can I Weld Outside With Mig?
Welding outdoors is possible, but wind can blow away shielding gas. Use wind screens or switch to flux-cored wire for better results.
How Do I Know If My Weld Is Strong Enough?
A strong weld is shiny, flat, and well-penetrated. If the bead is dull or cracked, or if it breaks easily, adjust your settings and technique.
What Is The Best Wire For Mig Welding Mild Steel?
The most common wire for mild steel is ER70S-6. Match your wire size to the metal thickness for best results. For more details, check Lincoln Electric’s guide.
Learning MIG welding is easier when you understand these mistakes. By paying attention to details, settings, and technique, you’ll get stronger and cleaner welds—and avoid costly errors. Keep practicing, and soon your welds will look professional.