
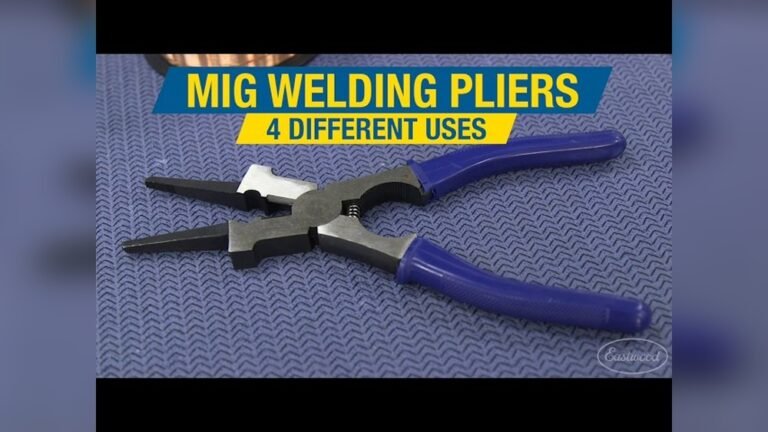
Mig welding pliers are a versatile tool every welder needs. They are designed to handle multiple tasks on a welding job, making your work faster and safer. From holding metal to cleaning your welding gun, these pliers are essential for MIG welding.
Understanding how to use these pliers correctly will improve your efficiency and the quality of your welds. They are not just simple pliers; they are specialized tools built for the demands of welding. This guide will walk you through everything you need to know about using mig welding pliers effectively.
What Are Mig Welding Pliers?
Mig welding pliers are multi-functional tools designed specifically for MIG (Metal Inert Gas) welding. Unlike standard pliers, they have features tailored to the unique needs of the welding process. Their primary purpose is to assist welders with various tasks related to the welding gun and the workpiece.
These pliers typically include a hammering end, wire cutters, a nozzle cleaning area, and tip removal grips. The hammering end can be used for light adjustments or to knock off excess slag. The cutters are strong enough to snip welding wire. The gripping sections are designed to easily remove and install MIG gun consumables like the nozzle and contact tip.
Key Features And Their Uses
Each part of the mig welding pliers serves a specific function, making them an indispensable tool in a welder’s kit. Understanding these features allows you to maximize their utility.
Hammering End
The back of the pliers often features a flat or slightly rounded hammering surface. This is useful for light tapping to remove spatter or slag from the workpiece or the welding gun. It’s not meant for heavy-duty hammering but for quick, precise adjustments.
Wire Cutters
Integrated into the jaws are sharp, robust cutters. These are perfect for trimming the welding wire after a weld or before starting a new one. Keeping the wire at the correct length is important for consistent weld quality.
Nozzle Cleaning Area
Many mig welding pliers have a conical or grooved section designed to clean the inside and outside of the MIG gun’s nozzle. This area helps remove hardened spatter and flux buildup that can obstruct gas flow and affect the weld. A clean nozzle ensures proper shielding gas coverage, which is crucial for preventing weld defects.
Tip Removal Grips
The jaws of the pliers are shaped to grip the contact tip securely. The contact tip is a consumable part that wears out and needs regular replacement. These pliers make it easy to unscrew a hot or stuck tip without damaging the threads on the gun liner.
Nozzle Grips
Similar to tip removal, the pliers often have a section designed to grip the welding nozzle. This allows for quick removal and replacement of the nozzle, whether for cleaning or changing it. This is especially helpful when the nozzle is hot from welding.

Credit: www.youtube.com
How To Use Mig Welding Pliers: Step-by-step
Using mig welding pliers correctly ensures safety and efficiency. Here’s a breakdown of how to perform common tasks.
1. Preparing Your Welding Gun
Before you start welding, inspect your MIG gun. Ensure the contact tip is clean and the correct size for your wire. Check the nozzle for any spatter buildup.
Use the nozzle cleaning area on your pliers to scrape out any hardened spatter inside the nozzle. Then, use the tip removal grips to unscrew the contact tip. Clean the tip with a wire brush or replace it if it’s worn out.
Screw the clean or new tip back in firmly.
2. Trimming The Welding Wire
After finishing a weld or when starting a new one, the welding wire might extend too far from the tip. Use the wire cutters on your pliers to snip the wire to the recommended length, typically about 1/4 to 3/8 inch (6-10 mm) protruding from the tip. Proper wire extension helps maintain a stable arc.
3. Removing And Replacing The Contact Tip
When the contact tip is worn or damaged, it needs replacement. Warning: Always ensure your welding machine is turned off and the gun is cool before attempting to change the tip. Even then, it can be hot.
Grip the contact tip firmly with the tip removal section of your pliers. Unscrew it counter-clockwise. To install a new tip, screw it in by hand as tightly as possible, then use the pliers to give it a final snug turn.
4. Removing And Cleaning The Nozzle
The nozzle directs the shielding gas and protects the contact tip. Spatter buildup can disrupt gas flow.
Grip the nozzle with the nozzle grip section of your pliers. Unscrew it counter-clockwise. Clean the inside and outside of the nozzle thoroughly with a wire brush. For stubborn spatter, you can use the hammering end to gently tap the nozzle, but be careful not to deform it. Reinstall the nozzle by hand and then snug it with the pliers.
5. Knocking Off Spatter
During welding, small droplets of molten metal (spatter) can fly onto your workpiece or the gun. Use the hammering end of the pliers to gently tap these pieces away. This is useful for quick clean-up between welds or to free up a sticky nozzle.
Mig Welding Pliers Vs. Standard Pliers
While both are gripping tools, mig welding pliers are specialized for the welding environment. Standard pliers might not have the right grip, heat resistance, or specific features like nozzle cleaners.
| Feature | Mig Welding Pliers | Standard Pliers (e.g., Slip-joint) |
|---|---|---|
| **Primary Use** | MIG gun maintenance, wire trimming, light tapping | General gripping, cutting, bending |
| **Tip Removal** | Designed to grip and unscrew MIG contact tips | Not designed for this task |
| **Nozzle Cleaning** | Integrated cleaning surfaces for MIG nozzles | No specific cleaning features |
| **Wire Cutting** | Integrated, robust wire cutters | Varies, often less effective |
| **Hammering** | Built-in hammering end for light tapping | Usually not present or inadequate |
| **Heat Resistance** | Often made with materials that offer some heat resistance | Generally not heat resistant |
Standard pliers can be used in a pinch for some tasks, but they are less efficient and can potentially damage your MIG gun components. For example, trying to remove a hot contact tip with regular pliers might result in a poor grip, slipping, and potential burns or damage to the tip threads.

Credit: pliersman.com
Choosing The Right Mig Welding Pliers
When selecting mig welding pliers, consider a few factors to ensure you get a durable and functional tool.
Material And Construction
Look for pliers made from high-quality steel. This ensures durability and resistance to wear and tear. The gripping surfaces should be strong and well-defined to provide a secure hold on tips and nozzles.
Ergonomics And Comfort
Since you’ll be using them frequently, comfortable handles are important. Some pliers have rubberized grips that offer better control and reduce hand fatigue. Consider the overall weight and balance of the pliers.
Additional Features
Some mig welding pliers come with extra features like insulating handles for added safety or a lanyard hole to prevent dropping the tool. Think about what additional features would be most beneficial for your welding setup.
Safety Tips When Using Mig Welding Pliers
Safety should always be your top priority when welding. Mig welding pliers, while helpful, require careful handling.
1. Always Power Down
Before attempting to remove or replace the contact tip or nozzle, ensure your welding machine is switched off. This prevents accidental arc starts and reduces the risk of electrical shock.
2. Beware Of Heat
Welding components, especially the contact tip and nozzle, can remain extremely hot for a significant time after welding. Allow them to cool down before touching them with your pliers. If you must work with hot parts, use extreme caution and consider heat-resistant gloves.
3. Use The Right Tool For The Job
While mig welding pliers are versatile, they are not designed for heavy-duty prying or hammering. Using them for tasks beyond their intended scope