
TIG welding is known for its clean, precise welds, but getting the settings right can be tricky. One of the most important factors is amperage. The right amperage helps you control heat, penetration, and the overall quality of your weld. If you set the amperage too high, you risk burning through thin metals. Too low, and you won’t get enough fusion. Understanding how to choose the best TIG welding amperage isn’t just for experts—anyone can learn the basics and avoid common mistakes with a bit of guidance.
What Is Tig Welding Amperage?
Amperage refers to the amount of electrical current flowing through your TIG torch. It affects how much heat is created at the weld. Higher amperage means more heat, which is better for thicker materials. Lower amperage is safer for thinner metals to prevent damage or warping.
Most TIG welding machines let you adjust the amperage easily. Some even have foot pedals for real-time control. But how do you decide what number to use? That’s where an amperage chart comes in handy.
Tig Welding Amperage Chart Explained
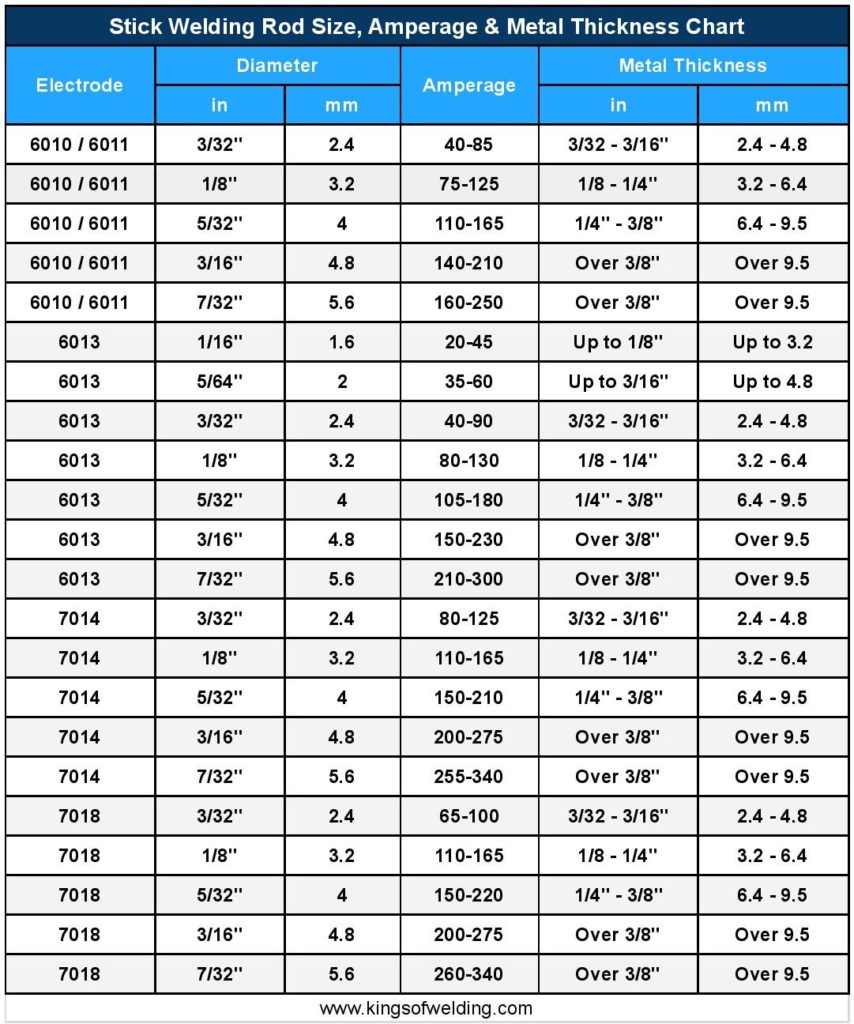
Welders often rely on an amperage chart to find a starting point. This chart matches material thickness, type, and tungsten size with the right amperage. While every welding situation is a bit different, the chart gives you a reliable range.
Here’s a sample TIG welding amperage chart for common metals:
| Material | Thickness (inches) | Tungsten Size (inches) | Amperage Range (A) |
|---|---|---|---|
| Steel (Mild/Carbon) | 1/16 (0.0625) | 3/32 | 50-70 |
| Steel (Mild/Carbon) | 1/8 (0.125) | 1/8 | 90-130 |
| Aluminum | 1/16 (0.0625) | 3/32 | 80-100 |
| Aluminum | 1/8 (0.125) | 1/8 | 130-170 |
| Stainless Steel | 1/16 (0.0625) | 3/32 | 50-75 |
| Stainless Steel | 1/8 (0.125) | 1/8 | 90-120 |
This table shows typical values, but always check your machine’s manual and adjust for your exact setup.
Key Factors That Affect Tig Welding Amperage
Choosing the right amperage isn’t just about following the chart. Here are a few factors that impact your settings:
1. Material Type
Different metals conduct heat differently. For example, aluminum requires higher amperage than steel of the same thickness.
2. Material Thickness
Thicker metals need more amperage to achieve full penetration. A simple rule: about 1 amp per 0.001 inch of material thickness works as a starting point.
3. Tungsten Electrode Size
The size of your tungsten matters. Larger electrodes can handle more amperage without overheating.
4. Joint Design
Lap joints and fillet welds may require different settings compared to butt joints, even with the same material.
5. Welding Position
Overhead or vertical welds often need slightly lower amperage to prevent sagging.
Common Mistakes To Avoid
Even with a chart, beginners often miss small details that can affect their results.
- Ignoring Tungsten Type: Not all tungsten electrodes behave the same. For example, 2% thoriated works well with steel, but pure tungsten is better for AC aluminum.
- Not Considering AC vs DC: Welding aluminum usually uses AC, while steel uses DC. AC generally requires higher amperage.
- Skipping Test Runs: Always run a quick test on scrap metal before starting your actual weld. This helps you fine-tune settings.
- Overheating the Workpiece: Too much heat can cause warping or burn-through, especially with thin metals.
- Forgetting to Clean the Metal: Dirt or oxidation affects the arc and amperage needed for a good weld.
Credit: fincalacoronilla.com
Example: Setting Amperage For Popular Metals
Let’s look at some practical examples to help you adjust your settings:
Welding 1/8-inch Mild Steel
- Choose a 1/8-inch tungsten electrode.
- Set amperage around 120A.
- Use DCEN (Direct Current Electrode Negative).
- Adjust up or down by 10 amps as needed.
Welding 1/16-inch Aluminum
- Use a 3/32-inch pure tungsten electrode.
- Set amperage to 90A.
- Use AC (Alternating Current).
- If the puddle doesn’t form well, increase by 5–10 amps.
Stainless Steel Sheet (0.050 Inch)
- Use 1/16-inch tungsten.
- Try 45–60A to start.
- Stainless heats up quickly, so back off the pedal if you see warping.
Quick Reference: Tungsten Size Vs Amperage
For fast decisions, this table matches common tungsten sizes with safe amperage ranges:
| Tungsten Size (inches) | Steel Amperage (DCEN) | Aluminum Amperage (AC) |
|---|---|---|
| 1/16 | 20–90 | 30–70 |
| 3/32 | 70–150 | 80–130 |
| 1/8 | 120–200 | 160–250 |
Always stay within the recommended range for your electrode size to avoid melting or unstable arcs.

Credit: www.perfectwelders.com
Advanced Tips For Better Tig Welding Results
- Pulse settings: If your machine has a pulse function, use it for thin metals. It allows you to use higher peak amperage for penetration while keeping the average heat lower.
- Foot pedal control: Practice using the pedal to adjust amperage as you weld. This gives you flexibility for changing joint thickness or direction.
- Shielding gas flow: Set your argon flow rate correctly (typically 15–20 CFH). Too much flow can disturb the arc; too little can cause contamination.
Two common misconceptions: First, many believe higher amperage always means better penetration. In reality, it can cause excessive spatter or melting. Second, beginners often skip preheating thick aluminum, which can help achieve better welds at lower amperage.
For more in-depth information on TIG welding and amperage recommendations, visit the Wikipedia page on Gas Tungsten Arc Welding.
Frequently Asked Questions
How Do I Know If My Amperage Is Set Correctly?
Look for a stable arc and a smooth weld puddle. If the puddle is too large or the metal melts away, reduce the amperage. If the arc is unstable or the weld does not penetrate, increase it slightly.
Can I Use The Same Amperage For All Metals?
No. Different metals conduct heat differently and require different amperage settings. Always adjust based on the material type and thickness.
What Happens If I Use Too Much Amperage?
Using too much amperage can cause burn-through, warping, or a rough, wide bead. It can also damage your tungsten electrode and make the weld look messy.
Is There A Simple Rule For Setting Tig Amperage?
A common rule is 1 amp per 0.001 inch of metal thickness. But always adjust based on your results and the specific situation.
Do I Need To Change Amperage During The Weld?
Yes, especially for long or complex joints. Use a foot pedal or finger control to adjust amperage as you go to maintain quality and avoid overheating.
Mastering TIG welding amperage is about practice and observation. Use charts as guides, but trust your eyes and adjust for each job. With time, setting the right amperage becomes second nature.

Credit: www.mig-welding.co.uk