
When you start with MIG welding, you quickly learn that amperage is not just a number. It’s a key factor that decides how strong, clean, and safe your welds will be. Whether you’re joining thin sheet metal or thick steel plates, the right amperage is the difference between a perfect bead and a messy, weak weld. But finding the correct settings can be confusing, especially for beginners. This guide will help you understand the MIG welding amperage chart, why it matters, and how to use it for better results.
What Is Mig Welding Amperage?
Amperage is the amount of electric current flowing through the welding wire. In MIG welding, this current heats the wire and melts it into the base metal. More amps mean more heat, which allows you to weld thicker materials. Too little amperage, and the weld won’t penetrate; too much, and you risk burning through.
Most MIG welders have adjustable amps, but knowing what to set is the challenge. The chart acts like a map—it shows the best amperage for different wire sizes and metal thicknesses. Understanding how to read and use this chart will improve your welding instantly.
Mig Welding Amperage Chart: Key Data
Let’s look at a typical amperage chart for MIG welding. These numbers are average values, but they give you a solid starting point.
| Metal Thickness (inches) | Wire Diameter (inches) | Recommended Amperage (amps) |
|---|---|---|
| 0.024 | 0.023 | 30–90 |
| 0.035 | 0.030 | 80–150 |
| 0.060 | 0.035 | 140–200 |
| 0.125 (1/8) | 0.045 | 180–250 |
These numbers are not fixed; you may need to adjust based on your machine, wire type, and welding position. Always start with the chart, then fine-tune by making test welds.
Factors That Influence Amperage
Setting the right amperage is not just about following the chart. Several factors impact what you need:
- Metal type: Stainless steel, aluminum, and mild steel all have different melting points.
- Joint design: Lap joints need more heat than butt joints.
- Wire speed: Faster wire feed increases amperage.
- Shielding gas: Argon mixes require different settings than pure CO₂.
Let’s compare how amperage changes for different metals:
| Metal | Wire Size | Amperage Range |
|---|---|---|
| Steel | 0.030″ | 80–150 |
| Aluminum | 0.030″ | 100–170 |
| Stainless Steel | 0.030″ | 90–140 |
Notice how aluminum needs higher amps than steel for the same wire size. That’s because it absorbs heat quickly.
Reading And Using The Amperage Chart
Knowing how to use the chart is more than just matching numbers. Here’s a step-by-step approach:
- Identify metal thickness: Measure the workpiece with calipers or a gauge.
- Choose wire diameter: Thicker wires are better for thicker metals.
- Set initial amperage: Use the chart as a starting point.
- Test weld: Make a small bead and check penetration.
- Adjust as needed: If the weld is too cold, increase amps. If it burns through, reduce amps.
Here’s a practical example: If you’re welding 1/8” steel with 0.035” wire, start at 180 amps. Watch the bead. If it’s tall and lacks fusion, bump up to 200 amps.

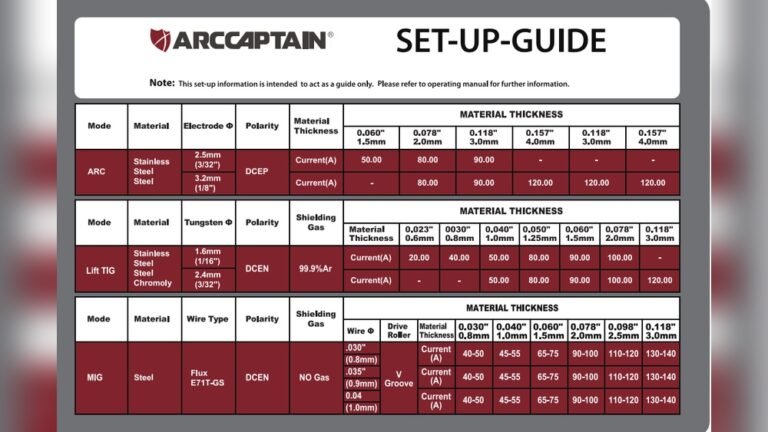
Credit: weldingdirect.com
Common Beginner Mistakes
Many new welders struggle with amperage. Here are mistakes to avoid:
- Guessing settings: Always use the chart; don’t rely on guesswork.
- Ignoring wire speed: Wire feed and amperage are linked. If you change one, adjust the other.
- Skipping test welds: Conditions change. Always test before welding the final joint.
A non-obvious tip: The color of the arc tells you a lot. A bright, stable arc means good amperage. A sputtering arc often means your settings are off.
Practical Tips For Better Mig Welding
Getting the right amperage is just part of the story. Here are smart ways to improve your welds:
- Use a clean workpiece: Rust and paint block current and reduce penetration.
- Maintain correct stick-out: Keep the wire tip about 3/8” from the metal.
- Read the bead: Good penetration shows as a flat, even bead.
- Watch for undercut: Too much heat can gouge the edges.
Another tip beginners often miss: Always check your power source voltage. Low voltage can make even the right amperage useless.

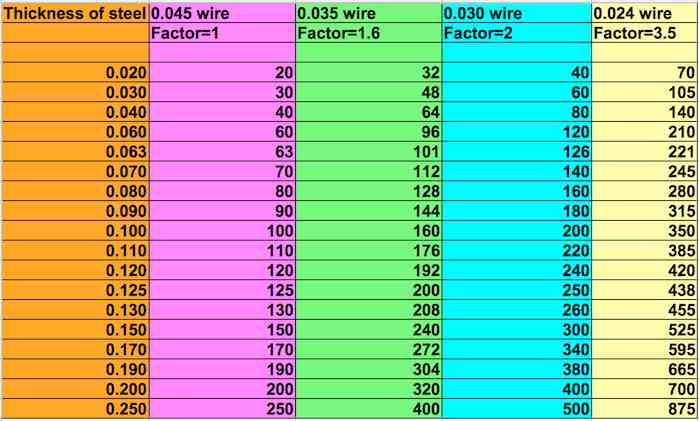
Credit: www.mig-welding.co.uk
Sample Amperage Settings For Common Projects
To help you start, here are sample settings for typical MIG welding jobs:
| Project | Metal Thickness | Wire Size | Amperage |
|---|---|---|---|
| Auto body repair | 0.030″ | 0.023″ | 70–90 |
| Home fence | 0.060″ | 0.030″ | 140–180 |
| Structural steel | 0.125″ | 0.035″ | 200–250 |
Use these as a guide, but always adjust for your exact situation.
Frequently Asked Questions
What Happens If I Use Too Much Amperage?
If the amperage is too high, you can burn through the metal, create excessive spatter, or cause undercut. It also weakens the weld.
How Do I Know If My Amperage Is Correct?
Look for a smooth, stable arc and a flat weld bead with good penetration. If the arc sputters or the bead sits tall, adjust your settings.
Does Wire Feed Speed Affect Amperage?
Yes. Faster wire feed increases amperage, so you need to balance both settings for best results.
Can I Weld Thick Metal With Low Amperage?
No. Low amperage won’t penetrate thick metal properly. Always increase amps for thicker materials and use the right wire size.
Where Can I Find Reliable Mig Welding Charts?
You can find trusted charts from manufacturers and welding organizations. For example, visit Lincoln Electric for professional charts and guidelines.
Getting the MIG welding amperage right is a mix of science and practice. The chart gives you a solid start, but experience helps you fine-tune for every job. With this guide, you’re ready to weld smarter and safer—no matter the project.
Credit: www.weldingtipsandtricks.com