
TIG welding is famous for its clean, precise results. But getting those perfect welds starts with choosing the right amperage for your metal. If you set the amperage too low, the weld won’t penetrate. Too high, and you risk burning the metal or making ugly welds. Many beginners guess or use random settings, but this leads to mistakes and wasted time.
Whether you’re working with aluminum, steel, or stainless steel, knowing the best amperage range can make your welding easier and safer. This article breaks down TIG welding amperage settings for every major metal, shares practical charts and comparisons, and answers the most common questions welders ask.
Tig Welding Amperage: Why It Matters
The amperage controls how hot your tungsten electrode gets. Higher amps mean more heat, which melts thicker metals. Lower amps work for thinner materials. TIG welding is unique because it allows fine control, but small changes can make a big difference.
For example, welding 1/8 inch aluminum may need 125 amps, while 1/8 inch stainless steel only needs about 90 amps. This is because different metals conduct heat differently and require special settings. Using the wrong amperage can cause warping, weak joints, or burn-through.
Amperage Settings Chart For Tig Welding
Here’s a practical chart showing recommended amperage ranges for common metals and thicknesses. These are starting points—adjust as needed for your project.
| Metal | Thickness (inches) | Recommended Amperage |
|---|---|---|
| Aluminum | 1/16 | 60–80 |
| Aluminum | 1/8 | 120–140 |
| Aluminum | 1/4 | 200–250 |
| Stainless Steel | 1/16 | 50–70 |
| Stainless Steel | 1/8 | 80–100 |
| Stainless Steel | 1/4 | 140–180 |
| Mild Steel | 1/16 | 40–60 |
| Mild Steel | 1/8 | 70–90 |
| Mild Steel | 1/4 | 130–150 |
These ranges help you avoid common mistakes, like blowing holes in thin steel or struggling to melt thick aluminum.

Credit: www.pacificarctigwelding.com
Comparing Tig Amperage Across Metals
Understanding how different metals respond to amperage is key. Take a look at this comparison of heat requirements:
| Metal | Heat Conductivity | Amperage Needed (1/8 inch) |
|---|---|---|
| Aluminum | High | 120–140 |
| Stainless Steel | Low | 80–100 |
| Mild Steel | Medium | 70–90 |
Aluminum needs higher amps because it pulls heat away quickly. Stainless steel stays hot longer, so use less amperage. This is a common point beginners miss: always consider the metal’s heat conductivity.
Practical Tips For Setting Tig Welding Amperage
Setting the right amperage takes more than following charts. Here are practical steps:
- Start low: Begin at the lower end of the recommended range. Increase slowly if the weld doesn’t penetrate.
- Watch the puddle: The weld puddle should be shiny and round, not dull or too wide.
- Check penetration: After welding, look at the back side. If you see a slight melt, you’re in the right range.
- Avoid overheating: If the metal turns red or starts to warp, lower the amperage.
- Adjust for joint type: Butt joints need more amps than lap joints.
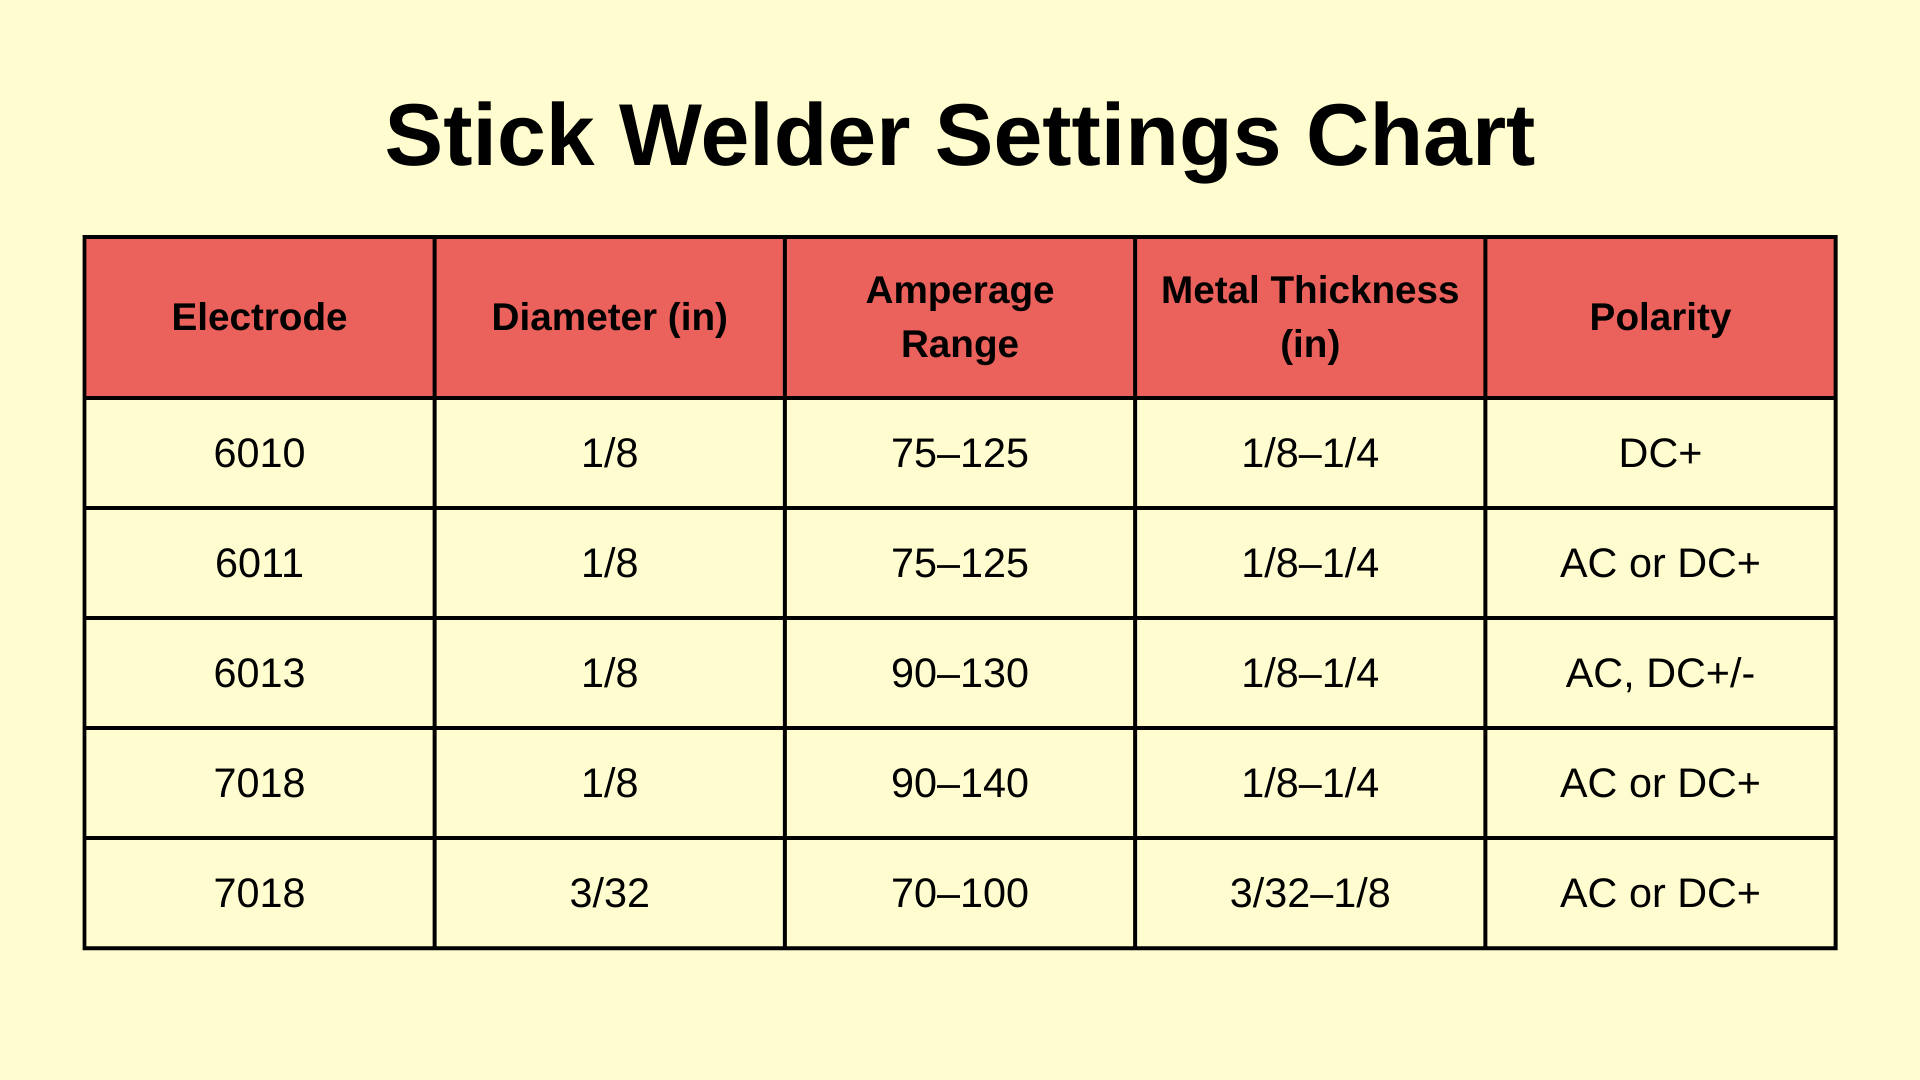
Many beginners forget to match the tungsten size to the amperage. For example, 3/32 inch tungsten can handle up to 150 amps, but above that, switch to 1/8 inch tungsten.

Credit: weldmongerstore.com
Tig Amperage For Special Metals
Some metals need special attention:
- Copper: Very high heat conductivity. For 1/8 inch copper, use 180–220 amps.
- Titanium: Needs a stable arc, so use 70–90 amps for 1/8 inch.
- Magnesium: Similar to aluminum, but a bit lower. Try 100–120 amps for 1/8 inch.
Always check the manufacturer’s recommendations for alloys. Special metals can react differently even within the same family.
Common Mistakes With Tig Amperage
Beginners often make these mistakes:
- Using one setting for all metals: Each metal and thickness needs its own amperage.
- Ignoring electrode size: Small electrodes can melt or contaminate if amps are too high.
- Not adjusting for position: Overhead welding needs less amperage than flat welding.
- Skipping test welds: Always run a test bead before welding your real project.
Welding in a cold shop? You may need higher amperage, because cold metal absorbs heat faster. This is a detail many guides miss.
Credit: www.arccaptain.com
Advanced Amperage Tips
If you want perfect welds, try these expert tricks:
- Use a foot pedal to fine-tune amperage during welding. This lets you react to changing conditions.
- For thin metals, “pulse” the amperage—use short bursts of high amps. This keeps the metal cool but gives good penetration.
- When welding aluminum, try AC balance controls on your TIG machine. More cleaning action means less amperage needed.
Many pros keep a log of their favorite settings for each project. This helps when switching between jobs or metals.
Frequently Asked Questions
What Happens If I Use Too Much Amperage?
Too much amperage can cause burn-through, warping, and rough welds. It also shortens electrode life and risks damaging your workpiece.
How Do I Choose The Right Tungsten Size?
Match tungsten size to amperage. For 40–120 amps, use 3/32 inch. For 120–200 amps, use 1/8 inch. Using the wrong size can cause arc instability.
Can I Tig Weld Without A Foot Pedal?
Yes, but a foot pedal gives precise control. Without it, set your machine slightly lower and weld slower to avoid overheating.
Why Does Aluminum Need Higher Amperage?
Aluminum conducts heat very well, so it needs more amperage to reach welding temperature. Steel and stainless steel need less because they hold heat better.
Where Can I Find More Detailed Tig Welding Charts?
You can find advanced charts and calculators at Miller Welds, a trusted industry source.
Setting the right TIG welding amperage makes your work smoother, safer, and more professional. With these charts and tips, you can tackle any metal confidently. Remember to test, adjust, and keep learning—good welds come from experience and careful settings.