
Reading a weld bead is a skill every welder, inspector, or hobbyist must learn. Whether you work in construction, manufacturing, or automotive repair, understanding weld beads helps you judge quality, safety, and performance. Many beginners focus only on whether a weld “looks good.
” But appearance is only one part. Reading a weld bead means knowing how to spot problems, measure strength, and predict how the weld will behave under stress.
What Is A Weld Bead?
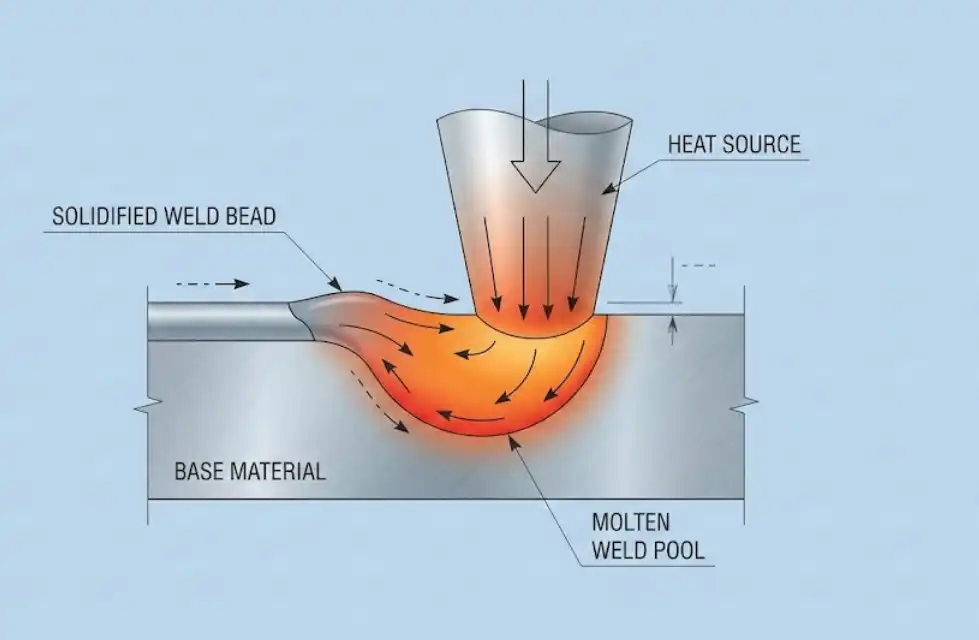
A weld bead is the line or area of melted metal created during welding. As the welder moves along the joint, the bead forms and cools. The bead’s shape, size, and surface all give clues about the welding process and the weld’s quality.
You will see different bead types depending on the welding method. For example, stringer beads are straight and narrow, while weave beads move side-to-side and are wider. Each weld bead tells a story about the heat, speed, and skill used.
Key Features To Examine
Reading a weld bead involves looking at several features. Each one reveals something important.
1. Shape And Size
The shape of a bead tells you if the weld was made at the right speed and temperature. A good bead is usually smooth, even, and slightly convex. Too convex means too much filler; too concave means not enough.
Here’s a comparison of bead shapes:
| Bead Shape | What It Means |
|---|---|
| Smooth and even | Proper settings and technique |
| Convex | Too much filler, possibly weak |
| Concave | Not enough filler, may crack |
The size matters too. For strong welds, the bead should be wide enough to cover the joint but not so wide it weakens the metal. According to the American Welding Society, most fillet welds should be 1/4 to 3/8 inch wide.
2. Surface Appearance
A clean, shiny surface often means a good weld. Look for uniform ripples—the pattern on the bead. If the ripples are steady and regular, the welder kept a good pace.
Watch for these surface problems:
- Porosity: Tiny holes or bubbles in the bead. Usually from trapped gas. Weakens the weld.
- Cracks: Lines running through the bead. These are dangerous and mean the weld will fail.
- Undercut: A groove at the edge of the bead where metal is missing. Makes the joint weaker.
3. Penetration
Penetration is how deep the weld goes into the base metal. Good penetration means the weld will hold under stress. You can check penetration by looking at the back of the joint or the cross-section.
Compare penetration levels:
| Penetration | Strength |
|---|---|
| Full | Maximum strength |
| Partial | Medium strength |
| Poor | Weak, unsafe |
Too much penetration can burn through the metal; too little leaves the joint weak.

Credit: www.welding.org
Reading Different Weld Types
Not all welds are the same. Here are common types and what to look for:
Fillet Weld
Used to join two pieces at a right angle. The bead should fill the corner without gaps. A good fillet weld is triangular with equal leg sizes.
Butt Weld
Joins two pieces edge-to-edge. The bead should be even across the seam. Watch for undercut and check that the weld ties both sides together.
Lap Weld
One piece overlaps another. The bead should run smoothly along the edge, covering both metals.
Here’s a quick reference:
| Weld Type | Key Signs of Quality |
|---|---|
| Fillet | Full corner, equal sides, no gaps |
| Butt | Even bead, no undercut, full penetration |
| Lap | Smooth edge, covers both pieces |
Common Mistakes When Reading Weld Beads
Many beginners miss subtle signs. Here are mistakes to avoid:
- Focusing only on looks. A pretty weld can still be weak if it has poor penetration.
- Ignoring the backside. Always check the other side for penetration and defects.
- Missing small cracks. Even tiny cracks can mean the weld will fail under pressure.
- Overlooking undercut. It’s easy to miss, but undercut reduces strength.
- Not measuring bead width. Too wide or too narrow beads can both be problems.
A useful tip: Use a weld gauge to measure bead size. It’s a simple tool but helps you check if the weld meets standards.
Credit: oceanplayer.com
Practical Tips For Accurate Reading
- Use good lighting. Shadows hide defects.
- Clean the weld area before inspection.
- Use a magnifying glass for close-up checks.
- Compare with reference welds or standards.
- Take notes and photos for record-keeping.
Non-obvious insight: Sometimes, a weld bead changes color. Blue or brown tint means overheating, which can weaken the weld even if it looks fine.
Another tip: Look for consistency along the bead. Inconsistent width or ripples often signal changes in speed or voltage, which lead to weak spots.
Frequently Asked Questions
How Can I Tell If A Weld Bead Is Strong?
Check for full penetration, steady ripples, and no visible cracks or porosity. Strong weld beads are smooth, consistent, and have the right size.
What Is The Most Common Defect In Weld Beads?
Porosity is the most common. It looks like small holes or bubbles and comes from trapped gas. Porosity weakens the weld and can cause failure.
Can I Inspect A Weld Bead Without Tools?
You can spot obvious problems like cracks or undercut by eye, but for accurate checks, use a weld gauge or magnifying glass. Some defects are too small to see without tools.
Why Is Bead Width Important?
Width affects strength. Too narrow means not enough filler; too wide can weaken the base metal. Most welds need to match specific width standards set by groups like the American Welding Society.
Where Can I Find Official Welding Standards?
The best resource is the American Welding Society. Their standards explain bead size, quality, and inspection methods for all major weld types.
Understanding how to read a weld bead helps you judge quality, improve your welding, and avoid costly mistakes. With practice, you’ll spot problems quickly and know how to fix them. Remember, every weld tells a story—learn to read it, and you’ll build safer, stronger structures.
Credit: www.reddit.com