Welding is a powerful technique that joins metal pieces together. But with its bright sparks and intense light, welding can damage your eyes quickly if you’re not careful. That’s why choosing the right welding shade number for your helmet or goggles is not just a safety step—it’s essential to keep your vision safe. Many beginners think any dark lens is enough, but the real secret is matching the shade number to the welding process and amperage. Get this wrong, and you risk eye strain or even permanent injury.
What Is A Welding Shade Number?
A welding shade number tells you how dark a lens is. It measures how much light the lens blocks, protecting your eyes from dangerous ultraviolet (UV) and infrared (IR) rays. Shade numbers usually range from 4 to 14. The higher the number, the darker the lens, and the less light reaches your eyes.
A low shade number, like 4 or 5, is only for light work such as torch cutting or grinding. For arc welding, you need much darker shades—usually between 9 and 14.
Why Shade Numbers Matter
Many new welders focus only on comfort. But the real risk is “arc eye” or “welder’s flash”—a painful eye injury caused by UV rays. It can feel like sand in your eyes and may lead to long-term vision loss. Using the right shade stops these rays, reduces glare, and lets you see your work clearly.
Non-obvious insight: A lens that’s too dark can also be a problem. You might miss flaws in your weld, increasing the chance of mistakes.
How To Choose The Right Shade Number
The correct welding shade number depends on:
- The type of welding process
- The amperage (electrical current)
Welding processes like MIG, TIG, and Stick each create different light intensities. Higher amperage means more light, so you need a darker lens.
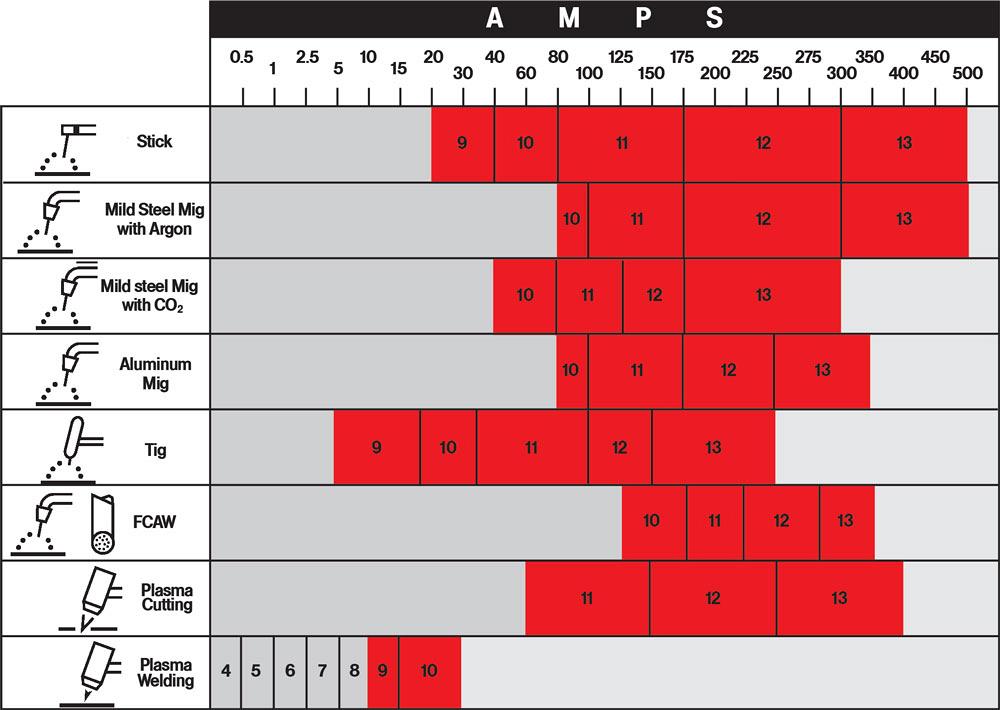
Here’s a simple guide:
| Welding Process | Amperage Range | Recommended Shade Number |
|---|---|---|
| Shielded Metal Arc (SMAW/Stick) | 20–40A | 9 |
| Gas Metal Arc (MIG) | 60–500A | 10–13 |
| Tungsten Inert Gas (TIG) | 10–250A | 9–12 |
| Flux-Cored Arc Welding | 60–600A | 10–14 |
Some auto-darkening helmets adjust automatically between shades, but you still need to set the correct range.
Standard Welding Shade Number Chart
Let’s look at a typical shade number chart based on welding current:
| Amperage | Suggested Shade |
|---|---|
| Less than 60A | 7–9 |
| 60–160A | 10 |
| 160–250A | 10–12 |
| 250–500A | 12–14 |
Always start with a higher shade. If you can’t see the weld puddle clearly, switch to a lower shade (but never below the recommended minimum).
Credit: www.canadianmetalworking.com
Comparing Different Shade Numbers
Choosing between shades can be confusing. Here’s a simple comparison:
| Shade Number | Light Transmission (%) | Best For |
|---|---|---|
| 9 | 0.037 | Low-amp TIG, light Stick |
| 10 | 0.021 | MIG, moderate Stick |
| 12 | 0.0075 | High-amp MIG, heavy Stick |
| 14 | 0.0012 | High-amp, industrial jobs |
Most hobby welders use a shade between 9 and 12. Industrial welders often need up to shade 14.
Practical Tips For Using Welding Shade Numbers
- Test before you weld: Hold your helmet up to a bright light source first. If you see clear outlines without discomfort, it’s likely suitable.
- Check standards: Use helmets that meet ANSI Z87.1 standards for eye protection.
- Use side shields: For extra safety, especially in bright workshops.
- Don’t ignore eye strain: If your eyes hurt after welding, your shade may be too light.
Non-obvious insight: Some auto-darkening lenses take milliseconds to change. Even this tiny delay can cause discomfort if you weld for hours.

Credit: vseyewear.com
Common Mistakes To Avoid
- Choosing by price only: Cheap helmets may not filter UV/IR well, even at higher shade numbers.
- Ignoring amperage: Don’t copy someone else’s settings without checking your own welding current.
- Using sunglasses or tinted glass: These do not protect from welding rays at all.
International Standards And Extra Guidance
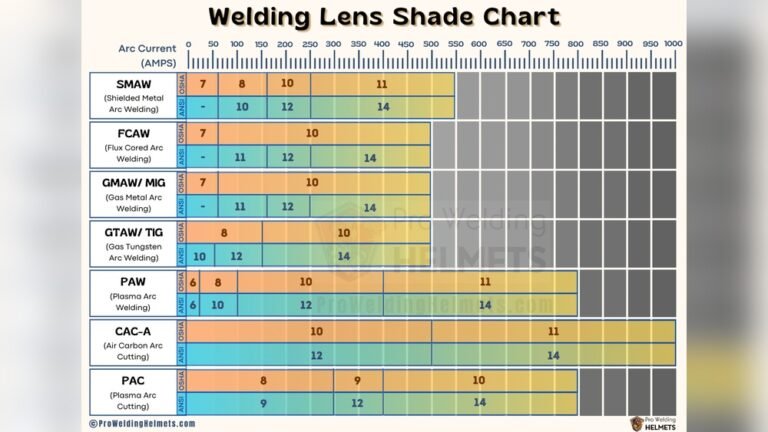
The American National Standards Institute (ANSI) and the Occupational Safety and Health Administration (OSHA) both set rules for welding eye safety. In Europe, look for EN 175 and EN 379 markings.
If you want more details about safety regulations, you can check the OSHA welding safety guide.

Credit: proweldinghelmets.com
Frequently Asked Questions
What Happens If I Use The Wrong Welding Shade Number?
If you use a shade that’s too light, you risk arc eye and long-term vision damage. If it’s too dark, you can’t see your work, which leads to mistakes and possible injury.
Can I Use The Same Shade Number For All Types Of Welding?
No. Different welding methods and amperages need different shade numbers. Always match the shade to the process and current.
Is An Auto-darkening Helmet Better Than A Fixed-shade Helmet?
Auto-darkening helmets offer more flexibility and comfort, especially if you switch between processes. Just make sure it meets safety standards and has a good reaction time.
How Do I Know If My Lens Is Safe?
Check for ANSI Z87. 1 or EN 379 certification. Also, inspect for cracks, scratches, or cloudiness, which can reduce protection.
Do I Need Eye Protection For Grinding Or Torch Cutting?
Yes, but you need a lower shade number (around 4–5) to protect against sparks and debris while still being able to see your work.
Welding is a valuable skill, but eye safety should always come first. Understanding and using the correct welding shade number keeps you protected and lets you focus on producing strong, clean welds. With the right helmet and knowledge, you can weld with confidence and keep your vision sharp for years to come.