Welding is a skill that combines art and science. If you want strong, clean welds, you must use the right settings. MIG welding is popular because it’s easy and fast. But many beginners struggle with the settings, especially when welding different metal thicknesses. If your settings are wrong, you get weak welds, burn-through, or lots of spatter. With a good MIG welding settings chart, you can avoid these mistakes and get much better results, even as a beginner.
Key Factors In Mig Welding Settings
MIG welding settings depend mainly on metal thickness, but there are other important factors:
- Wire diameter: Thicker wire can handle more current.
- Shielding gas type: Different gases affect penetration and spatter.
- Welding position: Flat, vertical, or overhead changes the needed settings.
- Material type: Mild steel, stainless steel, aluminum each require unique adjustments.
The most important thing is matching your settings to the thickness of your metal. Beginners often forget that even small changes in thickness need a change in voltage and wire speed.
Mig Welding Settings Chart By Metal Thickness
Choosing the right settings starts with knowing your metal’s thickness. Here is a practical MIG welding settings chart for mild steel, using common wire diameters and shielding gas (75% Argon, 25% CO2).
| Metal Thickness | Wire Diameter | Voltage (V) | Wire Speed (IPM) | Amperage (A) |
|---|---|---|---|---|
| 24 gauge (0.6 mm) | 0.023″ | 14-16 | 180-225 | 30-40 |
| 20 gauge (1 mm) | 0.023″ | 16-18 | 210-260 | 40-55 |
| 1/8″ (3.2 mm) | 0.030″ | 18-20 | 240-300 | 70-100 |
| 1/4″ (6.4 mm) | 0.035″ | 22-24 | 300-350 | 140-180 |
Note: These are starting points. Adjust slightly for your machine and joint design.
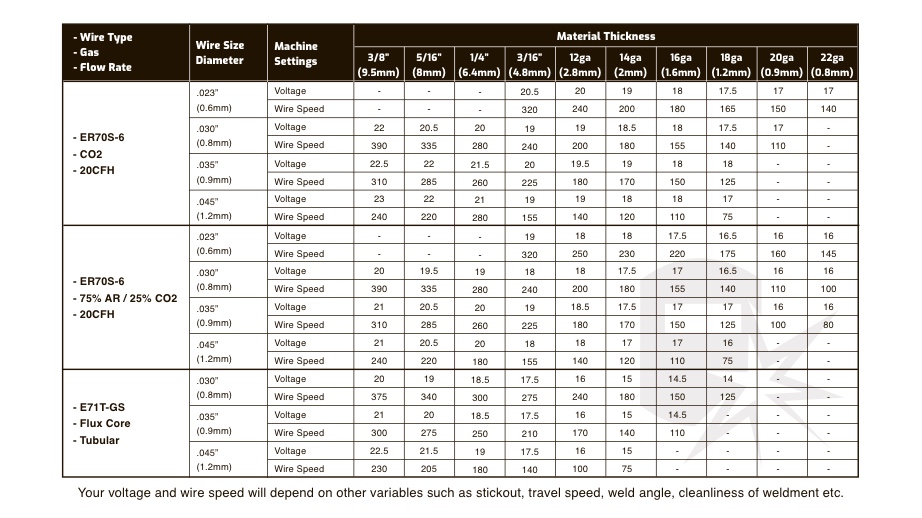
Credit: weldguru.com
How To Adjust Settings For Different Materials
Mild steel is the most common, but you may need to weld aluminum or stainless steel. Both require special settings.
| Material | Wire Type | Shielding Gas | Voltage Range |
|---|---|---|---|
| Mild Steel | ER70S-6 | 75% Argon / 25% CO2 | 14-24 V |
| Stainless Steel | ER308L | 98% Argon / 2% CO2 | 16-22 V |
| Aluminum | ER4043 | 100% Argon | 16-24 V |
For aluminum, use a spool gun and keep wire feed higher. Stainless steel needs lower wire speed and more precise gas flow.
Wire Diameter And Amperage Comparison
Wire size affects how much amperage you can use. Here’s a quick comparison:
| Wire Diameter | Recommended Amperage Range | Typical Use |
|---|---|---|
| 0.023″ | 30-90 A | Thin sheet metal |
| 0.030″ | 40-150 A | General purpose |
| 0.035″ | 50-180 A | Heavy metal, fabrication |
| 0.045″ | 80-250 A | Industrial, thick plate |
Tip: If you use too thick wire for thin metal, you risk burning through.
Practical Tips For Setting Up Your Mig Welder
- Always start with the chart settings. Run a test bead on scrap metal.
- Listen to the arc. A steady “buzz” means good settings. Popping or sputtering means you need to adjust wire speed or voltage.
- Check your weld bead. The bead should be smooth, not too tall or wide. If it’s sitting on top, raise the voltage. If it’s burning through, lower the voltage or wire speed.
- Don’t ignore gas flow. Most hobby welders use 20-25 CFH (cubic feet per hour) for shielding gas.
- Clean your metal. Dirt, rust, or paint will cause porosity and weak welds.
Non-obvious Insights Beginners Miss
- Ambient temperature affects weld quality. If your shop is cold, the weld penetration decreases. Warm the metal or increase voltage slightly.
- Cable length changes performance. Longer cables lose voltage. If you use a 25-foot cable, you may need to boost your settings a bit.

Credit: www.arccaptain.com
Avoiding Common Mig Welding Mistakes
- Wrong wire speed is the most frequent beginner error. If you see bird-nesting (wire jams in the feed), your speed is too high or too low.
- Overlapping welds (too much bead) weaken the joint. Keep your movement steady and match your speed to the settings.
- Incorrect gas choice causes heavy spatter or bad penetration. Always check your tank and regulator before starting.
Why Settings Charts Are Not “one Size Fits All”
Each welder brand and model may need slight tweaks. Machine calibration, wire quality, and even humidity can change settings. Use charts as a starting point, but always fine-tune for your exact machine.
If you want more technical details and official charts, you can visit the Welder Specs site, which lists many settings for different machines and wires.

Credit: www.arccaptain.com
Frequently Asked Questions
What Happens If I Use The Wrong Mig Settings For Metal Thickness?
If your settings are too high, you’ll burn through the metal. If they’re too low, your weld won’t penetrate, and the joint will be weak. Always match settings to thickness.
Can I Use One Wire Diameter For All Metal Thicknesses?
No. Thin wire works best for thin metal, while thick wire is needed for heavy metal. Using the wrong size causes poor welds and feeding problems.
How Do I Know If My Voltage Or Wire Speed Needs Adjustment?
Watch the bead and listen to the arc. If the bead is too tall or spatter is high, adjust voltage or wire speed. A smooth, even bead and steady sound mean good settings.
Is Shielding Gas Flow Important For Mig Welding?
Yes. Proper gas flow prevents contamination and porosity. Too little flow causes weak welds, while too much flow wastes gas and can disrupt the arc.
Can I Weld Aluminum With My Mig Welder?
Yes, but you need a spool gun, pure argon gas, and special aluminum wire. Aluminum needs higher wire speed and careful voltage adjustment.
Getting the best results in MIG welding is about matching settings to your metal thickness, wire diameter, and material type. Use charts as a guide, but always test and adjust for your specific setup. With practice and attention to detail, you’ll produce strong, clean welds every time.