
When you start MIG welding, it can be frustrating to see messy, weak, or ugly welds. You may wonder what went wrong, especially after following instructions and watching tutorials. Many beginners face this problem. The truth is, MIG welding needs practice—and knowing how to avoid common mistakes.
By fixing these issues, your welds will look smoother, stronger, and more professional.
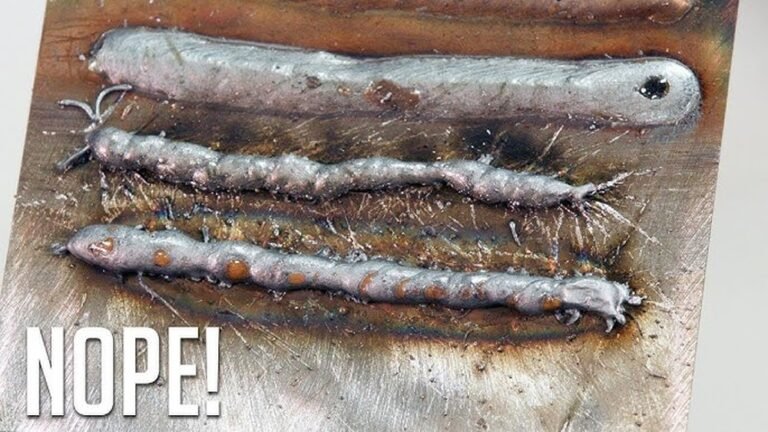
9 Common Mig Welding Mistakes—and How To Fix Them
Let’s look at the most frequent mistakes welders make and how you can solve each one.
1. Incorrect Wire Speed
If your wire speed is too high, the weld looks spattered and uneven. Too low, and the wire burns back, causing holes. You need balance.
- Fix: Start with the recommended settings for your machine and material. Adjust until the wire feeds smoothly and the weld bead is consistent. Listen for a steady “crackling” sound, like frying bacon.
2. Wrong Voltage Setting
Voltage controls the heat. Too much voltage causes wide, flat beads and burn-through. Too little gives tall, narrow welds with poor penetration.
- Fix: Check your machine’s chart for the right voltage. If you see holes or poor fusion, tweak the voltage a little at a time. Always test on scrap before welding your project.
3. Poor Workpiece Preparation
Dirty metal is a major reason welds look bad. Rust, oil, or paint block proper fusion.
- Fix: Clean your workpiece with a wire brush or grinder. Remove all contaminants before welding. Even invisible grease can ruin your bead.
4. Incorrect Gas Flow
Shielding gas protects the weld from air. If gas flow is too low, you get porosity (tiny holes) and weak welds. Too high wastes gas and can disturb the arc.
- Fix: Use 20–25 cubic feet per hour (CFH) for most jobs. Check for leaks in hoses. If you see bubbles or holes in your weld, increase gas flow slightly. Windy environments need more gas or a wind screen.
5. Bad Torch Angle
Your torch angle affects how the weld forms. If you hold the torch at the wrong angle, the bead won’t look even.
- Fix: Use a 10–15 degree push angle for most MIG welding. Keep the torch close to perpendicular, and move at a steady pace. Watch the puddle—not just the wire.
6. Moving Too Fast Or Slow
Speed matters. Moving too fast creates thin, weak welds. Too slow produces wide, lumpy beads.
- Fix: Aim for a travel speed that keeps the weld bead about two times wider than the wire. Practice on scrap to find the right pace. Beginners often rush—slow down and watch the bead form.
7. Wrong Wire Type Or Size
Using the wrong wire type or diameter leads to weak welds or excess spatter.
- Fix: For mild steel, use ER70S-6 wire. For aluminum, use ER4043 or ER5356. The most common size is 0.030 inch for most projects. Use thicker wire for heavier material.
8. Poor Ground Connection
A weak ground clamp causes unstable arcs, poor penetration, and ugly beads.
- Fix: Attach the ground directly to clean metal near your weld. Check the clamp for corrosion or damage. A strong ground makes the arc smoother and the weld stronger.
9. Ignoring Machine Maintenance
Dirty or poorly maintained machines cause feed problems and bad welds.
- Fix: Regularly clean your MIG welder, especially the wire feed mechanism. Replace worn liners and tips. Check cables for damage. A well-maintained machine gives better results.
Comparing Mig Settings: Voltage, Wire Speed, And Gas Flow
Here’s a simple comparison for typical mild steel (18 gauge–1/4”):
| Material Thickness | Voltage (V) | Wire Speed (IPM) | Gas Flow (CFH) |
|---|---|---|---|
| 18 Gauge | 16–18 | 150–200 | 20–25 |
| 1/8″ | 18–20 | 200–250 | 20–25 |
| 1/4″ | 22–24 | 250–350 | 25–30 |
These numbers are starting points. Always adjust based on your weld appearance and machine.

Credit: www.bernardtregaskiss.com
Wire Types And Applications
Choosing the right wire is important. Here’s a quick comparison:
| Wire Type | Best For | Notes |
|---|---|---|
| ER70S-6 | Mild Steel | Most common; good for rusty/dirty metal |
| ER4043 | Aluminum | Easy to weld, softer bead |
| ER5356 | Aluminum | Stronger, harder weld |
Mig Torch Angles: Push Vs Pull
The torch angle affects bead quality. Here’s a basic comparison:
| Angle | Bead Appearance | Best Use |
|---|---|---|
| Push (10–15°) | Smoother, flatter | General MIG welding |
| Pull (15–20°) | Thicker, more penetration | Heavy material, stick welding |

Credit: kwi.us
Two Insights Beginners Miss
- Sound matters as much as sight. A proper weld makes a steady, “bacon sizzle” sound. If you hear popping or hissing, check your settings.
- Practice on scrap metal before starting your project. Many beginners skip this and waste material. Adjust settings until the bead looks and sounds right.
Getting Better Welds: Practical Advice
Always read your MIG welder manual and check recommended charts. Use clean metal and proper wire. Don’t be afraid to experiment—small adjustments can make big improvements. Even experienced welders test settings before real jobs.
For more advanced details, visit Wikipedia’s MIG welding page.

Credit: www.youtube.com
Frequently Asked Questions
What Causes Porosity In Mig Welds?
Porosity is caused by air mixing with the weld. Common reasons: low gas flow, leaks, dirty metal, or wind blowing away shielding gas. Clean your workpiece and check for leaks.
Why Does My Weld Bead Look Too Tall?
A tall bead means low voltage or moving too slow. Increase voltage slightly and speed up your torch movement.
Can I Weld Rusty Metal With Mig?
You can, but results are poor. Use ER70S-6 wire for better performance on rusty metal, and always clean as much as possible.
How Do I Fix Spatter In Mig Welding?
Spatter is caused by high wire speed or too much voltage. Lower settings, clean your nozzle, and use anti-spatter spray.
Is It Normal For My Wire To Burn Back?
Wire burn-back happens when speed is too slow or voltage too high. Adjust wire feed and check the contact tip for damage.
Improving your MIG welds takes patience, practice, and attention to detail. Fixing these nine mistakes will help you achieve smoother, stronger, and more attractive welds. Don’t rush—take time to set up properly, and your results will show it.